01 - Welcome & Setup
Instructor and Agenda Introduction
Welcome to Introduction to Programming and Plotting with Python! This course is designed specifically for researchers who want to harness the power of Python for data analysis, visualization, and scientific computing. Whether you're working with experimental data, conducting literature reviews, or building computational models, Python will become an invaluable tool in your research toolkit.
My names is Victor Gambarini. I have been working with Python for more than ten years. I got my PhD from The University of Auckland, where I did a lot of bioinformatics and programming. One of my greatest research outputs is an online database of microorganisms tha can biodegrade plastics called PlasticDB. PlasticDB was 100% coded in Python and has been running stable for many years. It mostly uses a Python package called Flask. We will not be covering it here, but you will definitelly have the knowledge to learn Flask after this course!
About This Course
Over the next three days, we'll build your Python skills from the ground up, focusing on practical applications that researchers use daily. You'll learn not just the syntax, but how to think computationally about research problems. Another feature of this course is that it includes a lot of practice. Practicing is very important in programming so we can build what they call muscle memory. We will build lots of muscle memory in this course!
Course Structure
- Welcome & Setup - Getting started with Python and Colab
- Basic Syntax & Variables - Foundation of Python programming
- Data Structures - Lists, dictionaries, and more
- Control Flow - Making decisions and loops in code
- Functions - Writing reusable code
- File IO - Reading and writing data files
- DataFrames 101 - Introduction to pandas for data analysis
- Data Manipulation - Cleaning and transforming datasets
- Basic Plotting - Creating visualizations with matplotlib
- Advanced Plotting - Professional figures with seaborn
- GitHub for Researchers - Version control and collaboration
- Final Mini-Project - Apply your skills to a research problem
- Additional Resources - Where to go from here
What You'll Accomplish
By the end of this course, you'll be able to:
- Write Python scripts to automate repetitive research tasks
- Import, clean, and analyze datasets
- Create publication-quality visualizations
- Share your code and collaborate with colleagues
- Apply computational thinking to research problems
Prerequisites
No prior programming experience is required! We'll start from the very beginning. All you need is:
- A computer with internet access
- A Google account (for Colab)
- Curiosity and willingness to learn
Why Use Colab
What is Google Colab?
Google Colaboratory (Colab) is a free cloud-based platform that allows you to write and run Python code in your web browser. Think of it as a combination of a word processor and a Python interpreter, all running in the cloud.
Why Colab is Perfect for Researchers
1. No Installation Hassles
- No need to install Python, libraries, or manage environments
- Everything runs in your browser
- Works on any operating system (Windows, Mac, Linux)
2. Free Access to Powerful Computing
- Free GPU and TPU access for computational tasks
- Pre-installed scientific libraries (pandas, numpy, matplotlib, etc.)
- 12+ hours of continuous runtime per session
3. Easy Sharing and Collaboration
- Share notebooks like Google Docs
- Real-time collaboration with colleagues
- Integrated with Google Drive for automatic saving
4. Perfect for Learning
- Mix text, code, and output in one document
- Ideal for documenting your research process
- Great for creating reproducible analyses
5. Research-Friendly Features
- Built-in data visualization tools
- Easy file uploads and downloads
- Integration with Google Drive, GitHub, and other platforms
Colab vs. Other Options
| Feature | Google Colab | Local Python | Jupyter Lab |
|---|---|---|---|
| Setup Required | None | Extensive | Moderate |
| Cost | Free | Free | Free |
| Collaboration | Excellent | Poor | Good |
| GPU Access | Free | Expensive | Expensive |
| Sharing | Easy | Difficult | Moderate |
How to Open a New Notebook
Step 1: Navigate to Colab
- Open your web browser
- Go to colab.research.google.com
- Sign in with your Google account
Step 2: Create a New Notebook
- Click "New notebook" in the bottom right corner
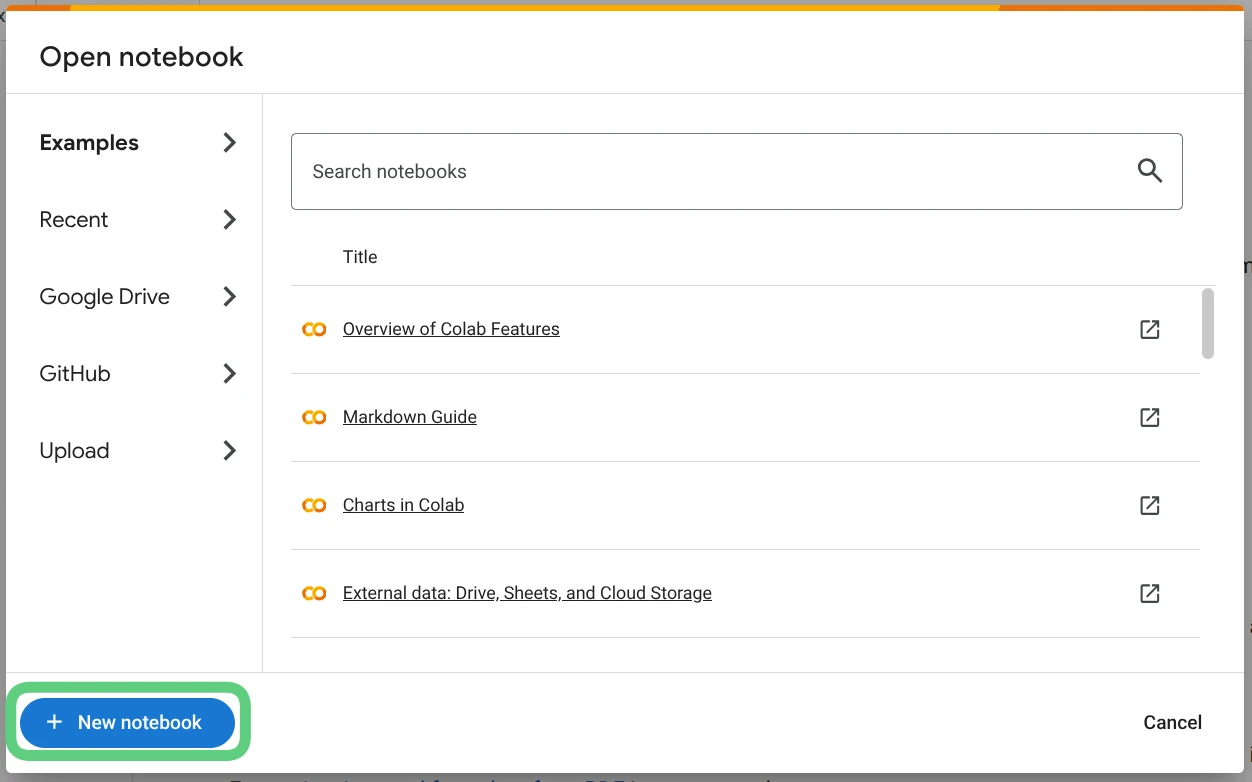
- Alternatively, use File > New notebook from the menu
- Your new notebook will open with a single empty cell
Step 3: Rename Your Notebook
- Click on "Untitled0.ipynb" at the top of the page
- Enter a descriptive name (e.g., "My First Python Notebook")
- The notebook will automatically save to your Google Drive
Text and Code Cells
Understanding Cell Types
Colab notebooks consist of two main types of cells:
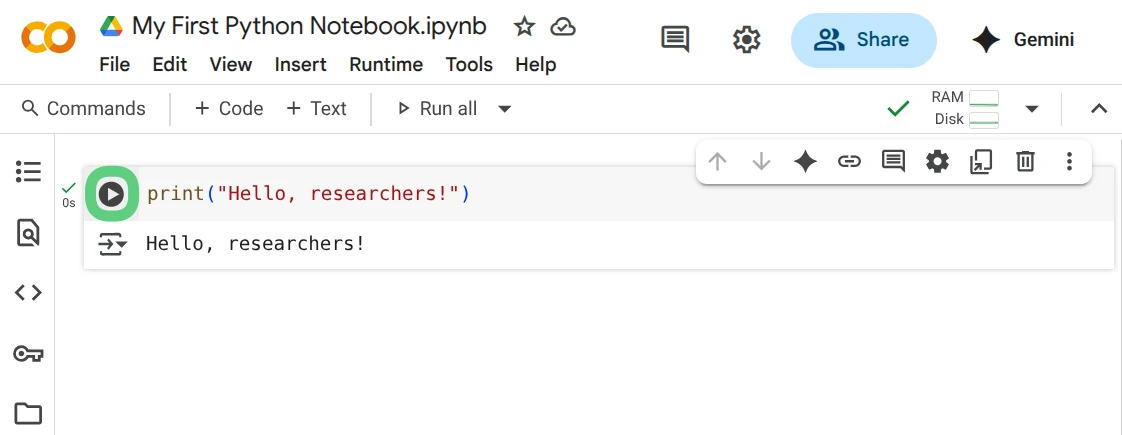
Code Cells
- Purpose: Write and execute Python code
- Recognition: Gray background with a play button () on the left
- Execution: Click the play button or press
Shift + Enter - Output: Results appear directly below the cell
Example Code Cell:
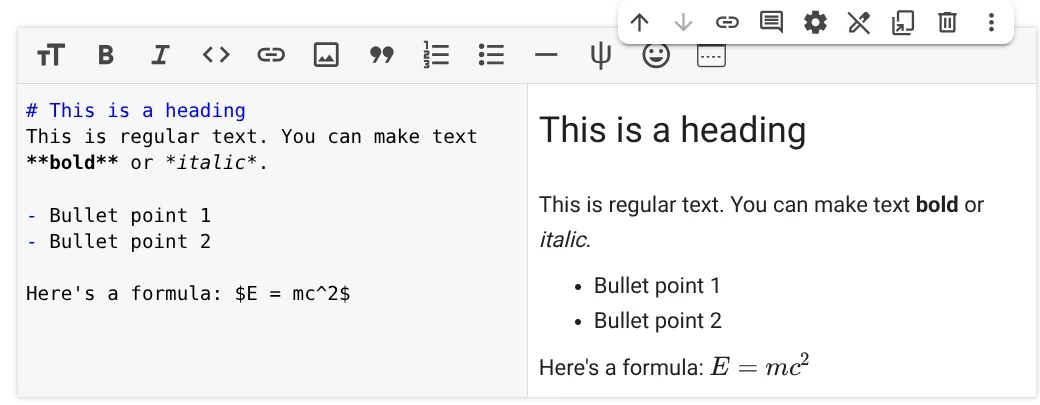
Text Cells
- Purpose: Add explanations, notes, and documentation
- Recognition: White background, markdown formatting
- Format: Uses Markdown syntax for formatting
- Editing: Double-click to edit,
Shift + Enterto render
Example Text Cell:
Creating New Cells
- Add Code Cell: Click
+ Codein the toolbar - Add Text Cell: Click
+ Textin the toolbar - Keyboard Shortcuts:
Ctrl + M, B- Add cell belowCtrl + M, A- Add cell above
Cell Operations
- Run Cell:
Shift + Enter - Delete Cell: Select cell, then
Ctrl + M, D - Copy Cell:
Ctrl + C - Paste Cell:
Ctrl + V - Move Cell: Use arrow buttons

Upload Files
We will first download the famous Penguins dataset from our website. Just download it from this link: penguincs.csv. Then we will upload it to Colab:
- Click the folder icon () in the left sidebar
- Click the upload button ()
- Select the penguins.csv file from your computer
- The file will appear in the
/content/directory

Note: Files uploaded this way are temporary and will be deleted when the runtime disconnects.
Save Notebook
Automatic Saving
- Colab automatically saves your notebook to Google Drive
- Saves occur every few minutes and after each cell execution
- Look for the "All changes saved" indicator in the toolbar

Manual Saving
- Keyboard shortcut:
Ctrl + S(Windows/Linux) orCmd + S(Mac) - Menu option: File > Save
Saving Options
1. Save a Copy
- File > Save a copy in Drive: Creates a duplicate
- File > Save a copy in GitHub: Saves to your GitHub repository
2. Download Options
- File > Download > Download .ipynb: Jupyter notebook format
- File > Download > Download .py: Python script format
- File > Download > Download .html: Web page format
- File > Download > Download .pdf: PDF document
Best Practices for Saving
- Use descriptive filenames: "Data_Analysis_Project1.ipynb" not "Untitled1.ipynb"
- Create copies before major changes: File > Save a copy in Drive
- Download backups of important work
- Use version control (we'll cover GitHub in Session 11)
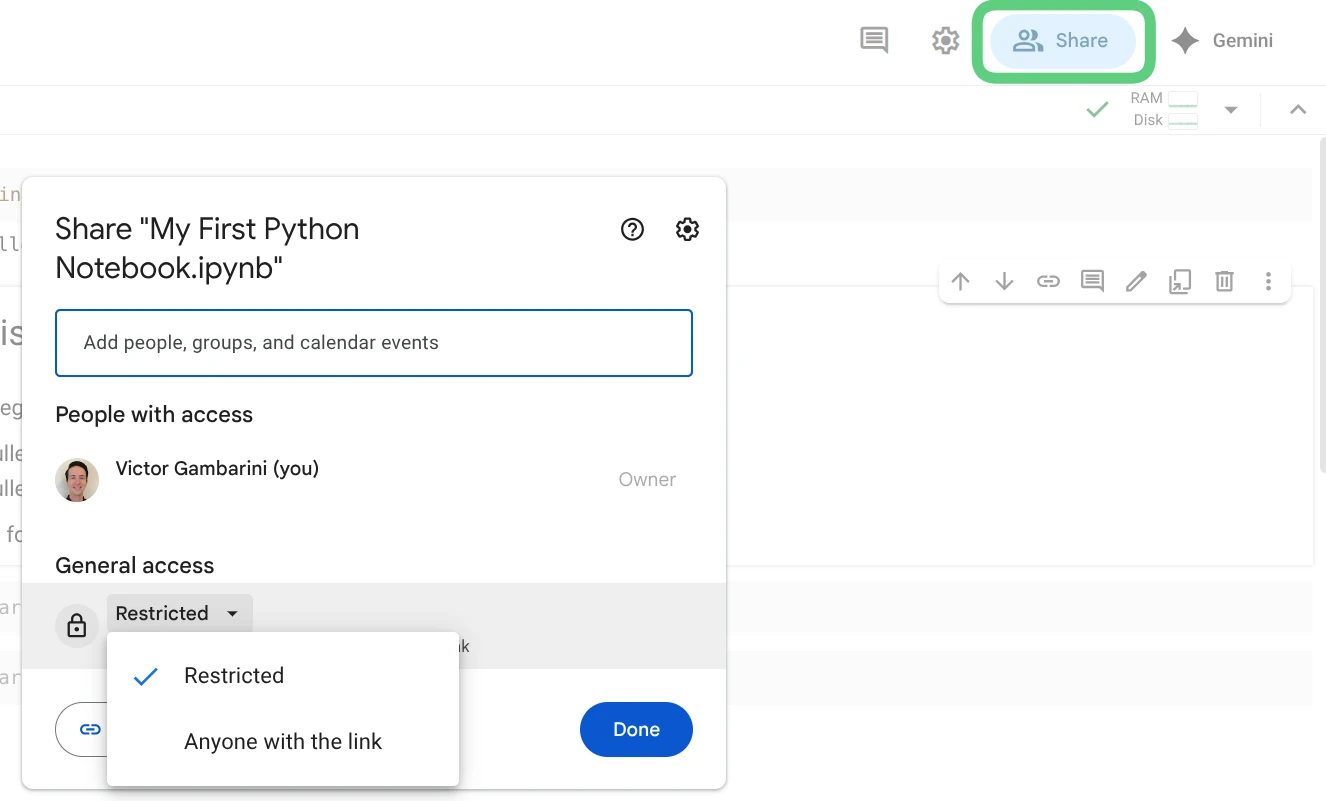
Sharing Your Notebook
- Click the "Share" button in the top right
- Choose sharing permissions:
- Restricted: Only you can access
- Anyone with the link: Anyone can view
- Anyone with the link can edit: Anyone can modify
- Copy the link to share with colleagues
Collaborative Features
- Real-time editing: Multiple people can edit simultaneously
- Comments: Add comments to cells for discussion
- Suggestions: Collaborators can suggest changes
- Version history: View and restore previous versions
Quick Reference
Essential Keyboard Shortcuts
Shift + Enter: Run cell and move to nextCtrl + Enter: Run cell and stay in current cellCtrl + M, D: Delete cellCtrl + M, A: Add cell aboveCtrl + M, B: Add cell belowCtrl + /: Comment/uncomment code
Getting Help
- In Colab: Help > Search code snippets
- For Python functions: Use
help(function_name)or?function_name - Documentation: Access built-in help with
??function_name
What's Next?
In our next session, we'll dive into Python basics - variables, data types, and fundamental operations. Make sure you can comfortably create notebooks, add cells, and save your work before we continue.
Enjoying this course?
This is just the first episode! Register to unlock 12 more episodes and complete your learning journey.
Register for Full Course